
Introduction
Magic WAN provides secure, performant connectivity and routing for your corporate networking. Using Magic WAN, you can securely connect any traffic source - data centers, offices, devices, cloud properties - to Cloudflare’s network and configure routing policies to get the bits where they need to go.
Magic WAN supports a variety of on-ramps including Anycast GRE or IPsec tunnels, Cloudflare Network Interconnect, Cloudflare Tunnel, WARP, and a variety of Network On-ramp Partners.
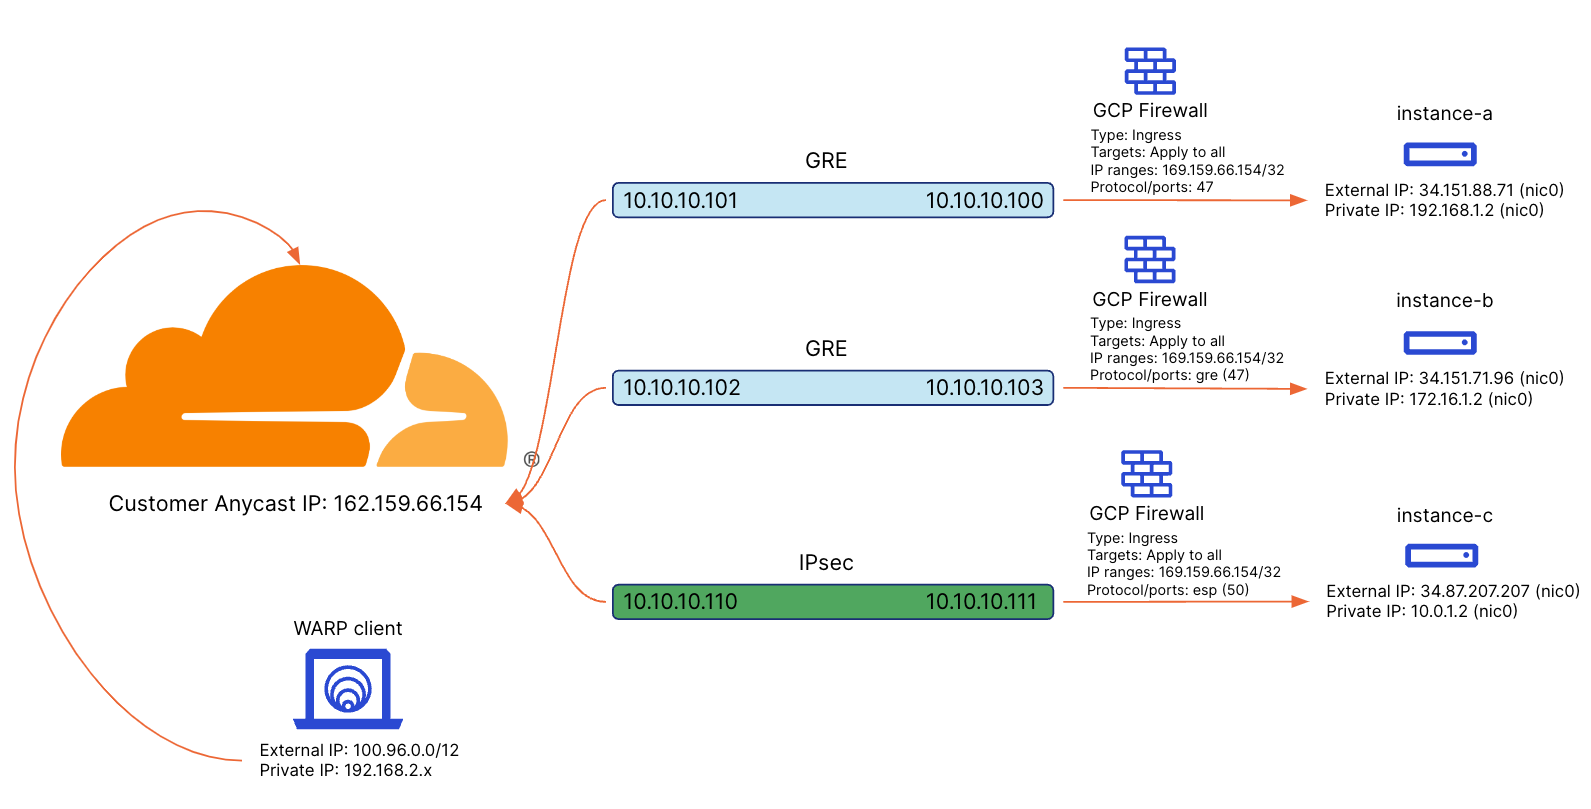
This post will step through the process of connecting a Google Cloud Platform (GCP) Ubuntu 22.04 (Jammy Jellyfish) instance to Magic WAN using an IPsec tunnel allowing the routing of traffic between a WARP device and the GCP instance via Magic WAN.
The full Magic WAN lab is as follows. This post only covers the configuration of instance-c and the WARP client.
Prerequisites
- Google Cloud Platform
- At least one GCP instances running Ubuntu 22.04. In this example there will be three VPC instances (instance-a and instance-b are using GRE, instance-c will be using IPsec) as follows:
- (optional) instance-a (External IP: 34.151.88.71, Internal IP: 192.168.1.2)
- (optional) instance-b (External IP: 34.151.71.96, Internal IP: 172.16.1.2)
- instance-c (External IP: 34.87.207.207, Internal IP: 10.0.1.2)
- Ingress firewall rule allowing protocol: esp (50) to instance-c
IPSec VPN is a layer 3 protocol that communicates over IP protocol 50, Encapsulating Security Payload (ESP). It might also require UDP port 500 for Internet Key Exchange (IKE) to manage encryption keys, and UDP port 4500 for IPSec NAT-Traversal (NAT-T). Through testing, it does not appear that UDP port 500 or 4500 are needed in the ingress rule.
This post will not cover setting up GRE tunnels (instance-a and instance-b) nor ingress rules allowing remote access to each instance. i.e. ssh, gre (47).
- At least one GCP instances running Ubuntu 22.04. In this example there will be three VPC instances (instance-a and instance-b are using GRE, instance-c will be using IPsec) as follows:
- Cloudflare Magic WAN - Requires an Enterprise contract.
- Anycast IP provisioned
- YAML account config uploaded with the warp_integration flag set. This must be done by your Cloudflare account team.
- Cloudflare Zero Trust
- Configuration to route packets back to WARP devices from services behind the GRE/IPsec/CNI/other tunnel types. WARP configuration
- Install strongSwan on instance-c
- strongSwan is an implementation of the Internet Key Exchange (IKE) protocols that allows securing IP traffic in policy-and-route based IPsec scenarios. In this example, I’m using Virtual Tunnel Interfaces to route traffic through the tunnel. Documentation can be found here: strongSwan Route-based VPN.
Instructions
-
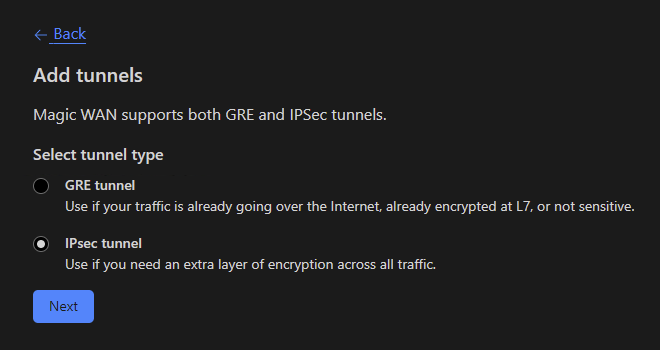
Configure IPsec tunnel(s) in the Cloudflare dashboard (dashboard > Magic WAN > Manage Magic WAN configuration > click Configure). Under the Tunnels tab, click Create.
-
Select
IPsec tunneland click Next.![image]()
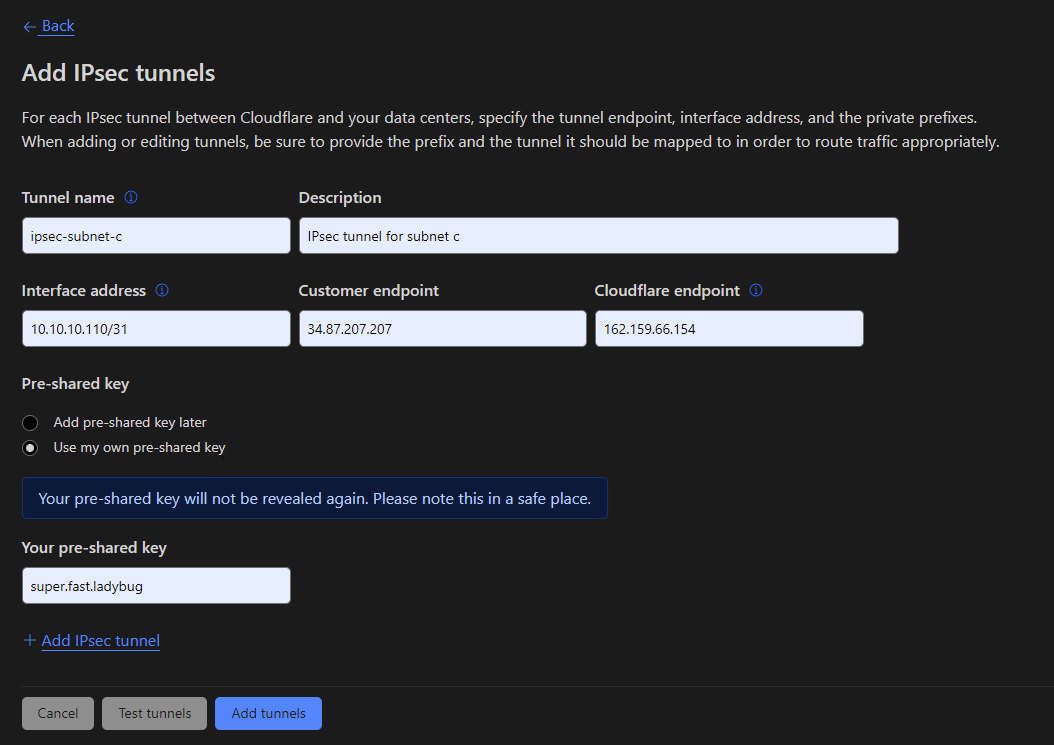
- Fill out the screen as follows:
- Tunnel name must be a valid Linux interface name.
- Interface address is the IP address for either side (left/host 10.10.10.111 right/Cloudflare 10.10.10.110) of the tunnel expressed in /31 CIDR notation.
- Customer endpoint is the public IP address for the host.
- Cloudflare endpoint is the customer specific Anycast IP.
- Use my own pre-shared key enter a suitable pre-shared key and click Add tunnels.
![image]()
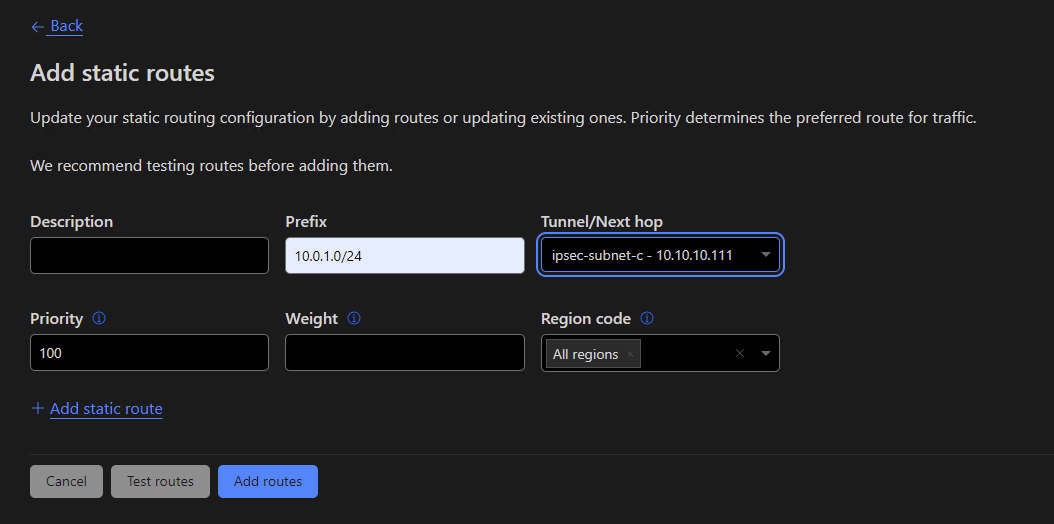
- Add the static route.
- Prefix is the IP prefix for the network. In this case
10.0.1.0/24is the network I want to be routable through Magic WAN. - Tunnel/Next hop select the appriate tunnel. In this case, it’s 10.10.10.111 which is the left/host side IP address of the tunnel.
- Priority can be left as the default value 100.
- Weight can be left blank.
- Region code can be left as default
All regions.![image]()
- Prefix is the IP prefix for the network. In this case
-
- Install strongSwan on instance-c using:
sudo apt-get install strongswan -y.It will be useful to install net-tools using
sudo apt install net-toolsto provide additional programs such asrouteifconfigetc. net-tools file list - On instance-c, configure
/etc/strongswan.conf. You need to addinstall_routes = noandinstall_virtual_ip = no. If you don’t do this, all traffic will route through the tunnel and you will lose access to the machine. This is because we are using0.0.0.0/0as theleft/righsubnetin/etc/ipsec.confwhich matches all traffic.delete_rekeyed_delay = 150is required to account for the rekeying delay. Rekey delay in IPsec is the time between a new Security Association being created on the Cloudflare edge and it being deployed across the fleet of metals. During this delay window, traffic for that tunnel will be dropped, health checks for that tunnel will fail and the tunnel will be marked as down. The delay window for all metals to receive the new Security Association is regularly between 90 seconds and 150 seconds. The Security Association propagates to all metals in a small window near the end of the delay, rather than slowly over the delay.install_virtual_ip = noprevents the daemon from also installing the VIP.install_routes = noprevents strongswan from adding routes to table 220.delete_rekeyed_delay = 150delay in seconds until inbound IPsec SAs are deleted after rekeyings. Documentation strongswan.conf1 2 3 4 5 6 7 8 9 10 11 12 13 14 15 16 17
# strongswan.conf - strongSwan configuration file # # Refer to the strongswan.conf(5) manpage for details # # Configuration changes should be made in the included files charon { load_modular = yes install_routes = no install_virtual_ip = no delete_rekeyed_delay = 150 plugins { include strongswan.d/charon/*.conf } } include strongswan.d/*.conf
-
On instance-c, configure
/etc/ipsec.conf. The strongSwan documentation can be found here: ConnSection. I’ve documented all the settings as best I can. The documentation can be hard to digest.1 2 3 4 5 6 7 8 9 10 11 12 13 14 15 16 17 18 19 20 21 22 23 24 25 26 27 28 29 30 31 32 33 34 35 36 37 38 39 40 41 42 43 44 45 46 47 48 49 50 51
# ipsec.conf - strongSwan IPsec configuration file config setup charondebug="all" uniqueids=yes conn %default ikelifetime=4h rekey=yes reauth=no keyexchange=ikev2 authby=secret dpdaction=restart closeaction=restart conn cf # what operation, if any, should be done automatically at IPsec startup. start loads a connection and brings it up immediately. auto=start # Optional (default is 0xffffffff) #mark=50 # the type of the connection; tunnel signifies a host-to-host, host-to-subnet, or subnet-to-subnet tunnel. type=tunnel # whether to use IKE fragmentation (proprietary IKEv1 extension or IKEv2 fragmentation as per RFC 7383). fragmentation=no # Authentication method to use on the host side. leftauth=psk # The IP address of the participant's public-network interface or one of several magic values. left=%any # how the left participant should be identified for authentication. Use the KEY ID in the cloudflare dash. leftid=43379399_d847811507c6473999fbababf58222ba # private subnet behind the left participant, expressed as network/netmask. leftsubnet=0.0.0.0/0 # The IP address of the participant's public-network interface or one of several magic values. This is the Cloudflare Anycast IP. right=162.159.66.154 # how the right participant should be identified for authentication. This is the Cloudflare Anycast IP. rightid=162.159.66.154 # private subnet behind the right participant, expressed as network/netmask. rightsubnet=0.0.0.0/0 # Authentication method to use on the Cloudflare side. rightauth=psk # comma-separated list of IKE/ISAKMP SA encryption/authentication algorithms to be used. The notation is encryption-integrity[-prf]-dhgroup. ike=aes256gcm16-prfsha512-modp2048 # comma-separated list of ESP encryption/authentication algorithms to be used for the connection. The notation is encryption-integrity[-dhgroup][-esnmode]. esp=aes256gcm16-prfsha512-modp2048 # The IPsec replay window size for this connection. replay_window=0 # Values must match, can be any 32-bit number, all examples use 42 (Hitchhiker's reference?). It's low level Linux kernel routing stuff. mark_in=42 mark_out=42 # what updown script to run to adjust routing and/or firewalling when the status of the connection changes. leftupdown=/etc/strongswan.d/ipsec-vti.sh
-
On instance-c, create
/etc/strongswan.d/ipsec-vti.sh. This is the script that will run whenever the tunnel is up/down at boot or by runningsudo ipsec up <conn name>orsudo ipsec down <conn name>. Use sudochmod +x /etc/strongswan.d/ipsec-vti.shto make it executable.1 2 3 4 5 6 7 8 9 10 11 12 13 14 15 16 17 18 19 20 21 22 23 24 25 26 27 28 29 30 31 32 33 34 35 36 37 38 39 40 41 42 43 44 45
#!/bin/bash set -o nounset set -o errexit IP=$(which ip) PLUTO_MARK_OUT_ARR=(${PLUTO_MARK_OUT//// }) PLUTO_MARK_IN_ARR=(${PLUTO_MARK_IN//// }) # Update the following variables VTI_IF="vti0" VTI_LOCAL_IP="10.10.10.111/31" # This is the host side of the tunnel VTI_REMOTE_IP="10.10.10.110/31" # This is the Cloudflare dash side of the tunnel ETH_INTF="ens4" # network Interface of the VM case "${PLUTO_VERB}" in up-client) $IP link add ${VTI_IF} type vti local ${PLUTO_ME} remote ${PLUTO_PEER} okey ${PLUTO_MARK_OUT_ARR[0]} ikey ${PLUTO_MARK_IN_ARR[0]} $IP addr add ${VTI_LOCAL_IP} remote ${VTI_REMOTE_IP} dev ${VTI_IF} $IP link set ${VTI_IF} up mtu 1436 sysctl -w net.ipv4.ip_forward=1 sysctl -w "net.ipv4.conf.${VTI_IF}.disable_policy=1" sysctl -w "net.ipv4.conf.${VTI_IF}.accept_local=1" sysctl -w "net.ipv4.conf.${VTI_IF}.rp_filter=0" sysctl -w "net.ipv4.conf.${ETH_INTF}.accept_local=1" sysctl -w "net.ipv4.conf.${ETH_INTF}.rp_filter=0" # Networks I want to route through the tunnel sudo ip route add 10.0.1.0/24 dev ${VTI_IF} sudo ip route add 10.10.10.0/24 dev ${VTI_IF} # Allows you to ping the left/host side of the tunnel sudo ip route add 172.16.1.0/24 dev ${VTI_IF} # Optional - instance-b network sudo ip route add 192.168.1.0/24 dev ${VTI_IF} # Optional - instance-a network sudo ip route add 100.96.0.0/12 dev ${VTI_IF} # this is the address range for WARP devices ;; down-client) # Delete the network routes when the tunnel is downed. sudo ip route del 10.0.1.0/24 dev ${VTI_IF} sudo ip route add 10.10.10.0/24 dev ${VTI_IF} sudo ip route del 172.16.1.0/24 dev ${VTI_IF} sudo ip route del 192.168.1.0/24 dev ${VTI_IF} sudo ip route del 100.96.0.0/12 dev ${VTI_IF} # Delete the tunnel ip tunnel del "${VTI_IF}" ;; esac
- Run the following commands:
sudo systemctl enable strongswan-starter- enable the strongswan-starter service at boot (default when installed).sudo ipsec reload- reloads the/etc/ipsec.conf. Run this when making config changes.sudo ipsec restart- restarts the daemon.sudo ipsec up cf- bring the tunnel up and runs/etc/strongswan.d/ipsec-vti.sh.It can take several minutes for the tunnel routes to start working.
sudo ipsec statusandsudo ipsec statusall- displays tunnel status information.sudo ipsec down cf- remove the tunnel and runs/etc/strongswan.d/ipsec-vti.sh.
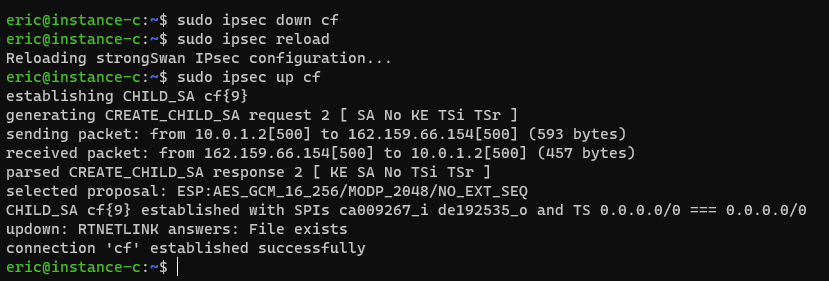
- Testing everything works.
- Reload the
/etc/ipsec.confconfig usingsudo ipsec reload. - Bring the tunnel up using
sudo ipsec up cf. Note that the connection is calledcfin/etc/ipsec.conf. -
The output should look like the image below.
![image]()
-
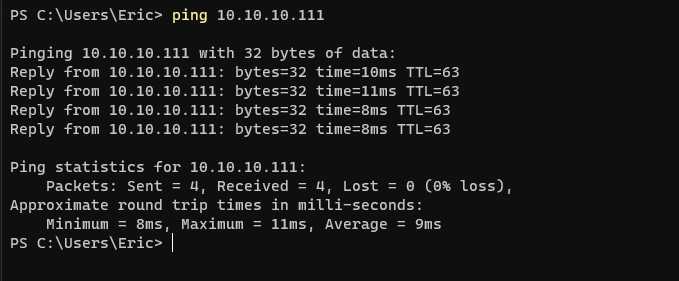
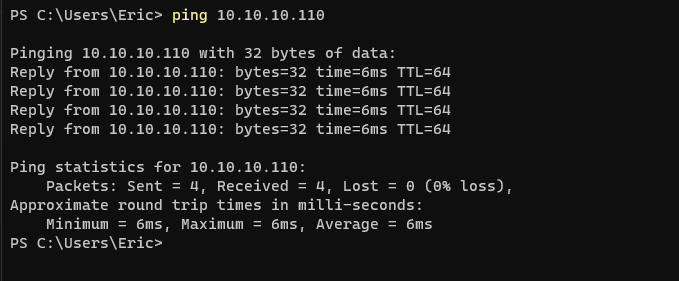
From the WARP connected device, ping the private IP address of instance-c (10.0.1.2). Ping the IP address of either side of the tunnel (Left/Host: 10.10.10.111 and Right/Cloudflare: 10.10.10.110). The output should look like the images below.
![image]()
![image]()
![image]()
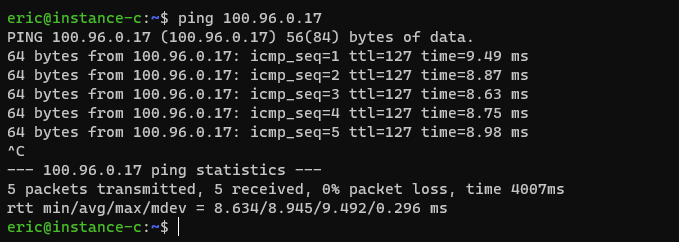
-
From instance-c, ping the WARP connected device. You can find the device IP address from dashboard > Zero Trust > My Team > Devices > Device.
![image]()
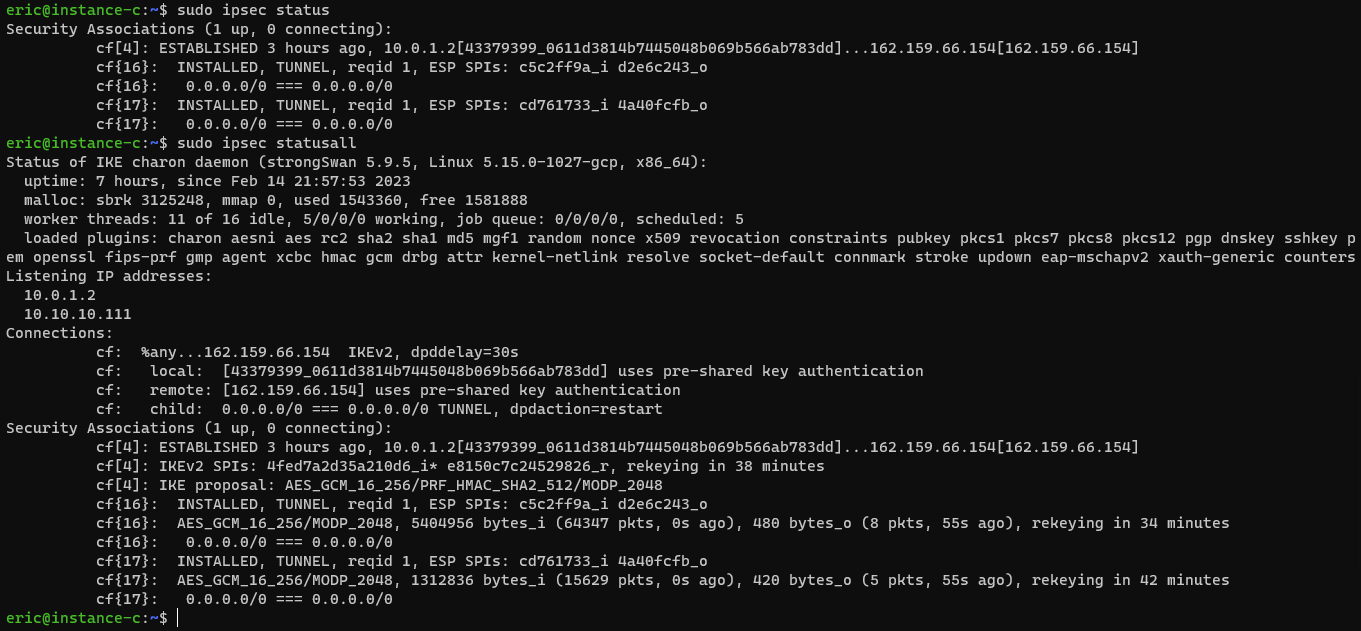
- Review the output of
sudo ipsec statusandsudo ipsec statusall. It should look like the image below.![image]()
- Reload the

Useful Commands
-
sudo systemctl stop/start/restart/status strongswan-startersystemctl is the systemd command for controlling how services start on a Linux system. Start/stop/restart does exactly that. -
sudo systemctl enable/disable strongswan-startersystemctl is the systemd command for controlling how services start on a Linux system. Enabling a service means it will start at boot. -
sudo ipsec reloadsends a USR1 signal to starter which in turn reloads the whole configuration of the running IKE daemon charon based on the actual ipsec.conf. -
sudo ipsec restartis equivalent to stop followed by start after a guard of 2 seconds. -
sudo ipsec up cftells the IKE daemon to start up connection name. -
sudo ipsec down cftells the IKE daemon to terminate connection name. -
sudo ipsec statusreturns concise status information either on connection name or if the argument is lacking, on all connections. -
sudo ipsec statusallreturns detailed status information either on connection name or if the argument is lacking, on all connections. -
sudo route -ndisplays the kernel IP routing table.