Introduction
At the time of writing, this feature is early access and can only be configure using the Cloudflare API. It will also be subject to change.
Cloudflare has just added the capability to load balance private IP addresses using Cloudflare Tunnel. This allows Cloudflare Load Balancing customers to use private IP addresses directly as origin targets within Load Balancing, instead of previously only being able to add the tunnel address as an origin.
This post will detail how to implement traditional Load Balancing using Cloudflare Tunnel as well as setting up a load balancer using private IP addresses. The target origin servers will be a small application running in docker.
Prerequisites
To follow the steps outlined in this post you will need the following:
- Visual Studio Code will be used to run API queries and test scripts using Python. The test web applications/servers are written in Python as well.
- Install Visual Studio Code
- Install Python
- Install Python extension
- Install Jupyter Notebook
- Install Docker extension
- Docker
- A docker host. This is where the Cloudflare Tunnel daemon’s (cloudflared) will run as well as the test web applications/servers.
- Optional - I recommend using Portainer. Instructions for installing on a standalone Docker host can be found here.
Note: Everything can be done using the docker CLI. This guide will assume you are using Portainer.
- Cloudflare Load Balancing
- You need a Cloudflare account entitled for Load Balancing with a sufficient number of origins. This post will use 5 origins in total.
- Cloudflare Zero Trust
- You have a Cloudflare Zero Trust team configured. Configuration steps: Cloudflare Zero Trust.
Application/Origin servers
We need a simple application to serve as the origin targets. For this I’m using a simple Python flask app using flask’s built-in web server. This will be built as a docker container image and deployed on the docker host.
- Create the following folder/file structure on your docker host.
1 2 3 4 5
hit-counter/ |- app/ |- app.py |- Dockerfile |- requirements.txt - Copy and paste the code below into
app.py. This app will run a web server listening on port 443. It will return a response containing a hit count and the request url as JSON.The listening port must be
443. Private IP load balancing only works for HTTP/HTTPS at the time of writing.1 2 3 4 5 6 7 8 9 10 11 12 13 14 15 16 17
from urllib import request from flask import Flask, jsonify, request from multiprocessing import Value counter = Value('i', 0) app = Flask(__name__) @app.route("/", methods=["GET"]) def upload_image(): with counter.get_lock(): counter.value += 1 out = counter.value return jsonify(url=request.url, count=out) if __name__ == "__main__": app.run(debug=True, host="0.0.0.0", port=80, threaded=True)
- Copy and paste the commands below into
Dockerfile.1 2 3 4 5 6 7 8 9 10 11 12 13 14 15
FROM python:3.6.15-slim RUN apt-get update COPY requirements.txt . RUN pip install -r requirements.txt EXPOSE 80 COPY app /app WORKDIR /app CMD python app.py
- Copy and paste the config below into
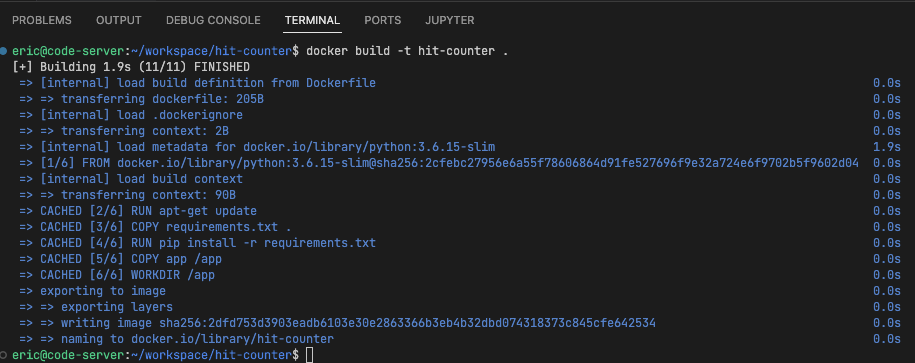
requirements.txt.Flask==1.1.1 - To build the container, navigate to the directory containing the
Dockerfile. Run the commanddocker build -t hit-counter .to build the container image. The ouput should look something like this.![image]()
Cloudflare Zero Trust (Part 1)
We now need to create the tunnels. In this case we’re going to create four (4) tunnels in total. Three (3) of the tunnels will be for the old way of load balancing origins. The fourth tunnel will be used for load balancing private IP addresses.
- Navigate to Cloudflare Zero Trust dash > Access > Tunnels.
- Give the Tunnel a name. My tunnels are named
cf-lb-node-1,cf-lb-node-2,cf-lb-node-3, andcf-lb-private-ip. The names don’t matter and can be anything that makes sense to you. Click Save tunnel. - Under Choose your environment, select Docker. Copy the docker command. It will look like the text below. The token is what we’re interested in and will be used for the docker-compose.yaml later.
1
 docker run cloudflare/cloudflared:latest tunnel --no-autoupdate run --token eyJhIjoiNjM4ZjJkNDA3MWUzNWYyZGY5YzYzNGNhMWNhZGZiNzIiLCJ0IjoiNGUwM2ZlZmUtZWJjOS00OWY2LTlmNWYtNWI5MTI3MWYyYmI4IiwicyI6Ill6aGhOREJsWWpJdE1XTXpNQzAwWXprekxXRmtNV1l0WVdabFl6VT<redacted>
- Repeat these steps for each tunnel. Keep track of which token belongs to each tunnel.
Portainer/docker
Now we’ll use Portainer to create the containers. Portainer Stacks is essentially the same as docker-compose, but you can edit the docker-compose file in the Web UI and deploy it without typing commands.
- In the Portainer dashboard, select your environment and go to Stacks. Click Add Stack.
- Give the Stack a suitable name and copy/paste the configuration below. In my case, I called the stack cf-lb-test.
A full list of the cloudflared image tags can be found here: cloudflared. If you want to lock your config to a specific version of
cloudflared, use the specific tag as follows:cloudflare/cloudflared:2022.6.3instead ofcloudflare/cloudflared:latest. Ensure that you update the below yaml configuration with your desired configuration. At minimum you need to update the--tokenstring with the tokens from the steps above.1 2 3 4 5 6 7 8 9 10 11 12 13 14 15 16 17 18 19 20 21 22 23 24 25 26 27 28 29 30 31 32 33 34 35 36 37 38 39 40 41 42 43 44 45 46 47 48 49 50 51 52 53 54 55 56 57 58 59 60 61 62 63 64 65 66 67 68 69 70 71 72 73 74 75 76 77 78 79 80 81 82 83
version: "3.7" services: # origin/node 1 cf-lb-test-node-1: image: hit-counter:latest container_name: cf-lb-test-node-1 restart: unless-stopped networks: - cf-lb-test - cf-lb-test-node-1-cloudflared - cf-lb-test-private-ip-cloudflared # tunnel 1 cf-lb-test-node-1-cloudflared: image: cloudflare/cloudflared:latest container_name: cf-lb-test-node-1-cloudflared restart: unless-stopped command: tunnel --no-autoupdate run --token eyJhIjoiNjM4ZjJkNDA3MWUzNWYyZGY5Y<redacted> networks: - cf-lb-test-node-1-cloudflared # origin/node 2 cf-lb-test-node-2: image: hit-counter:latest container_name: cf-lb-test-node-2 restart: unless-stopped networks: - cf-lb-test - cf-lb-test-node-2-cloudflared - cf-lb-test-private-ip-cloudflared # tunnel 2 cf-lb-test-node-2-cloudflared: image: cloudflare/cloudflared:latest container_name: cf-lb-test-node-2-cloudflared restart: unless-stopped command: tunnel --no-autoupdate run --token eyJhIjoiNjM4ZjJkNDA3MWUzNWYyZGY5YzYzNG<redacted> networks: - cf-lb-test-node-2-cloudflared # origin/node 3 cf-lb-test-node-3: image: hit-counter:latest container_name: cf-lb-test-node-3 restart: unless-stopped networks: - cf-lb-test - cf-lb-test-node-3-cloudflared # tunnel 3 cf-lb-test-node-3-cloudflared: image: cloudflare/cloudflared:latest container_name: cf-lb-test-node-3-cloudflared restart: unless-stopped command: tunnel --no-autoupdate run --token eyJhIjoiNjM4ZjJkNDA3MWUzNWYyZGY5YzYzNG<redacted> networks: - cf-lb-test-node-3-cloudflared # tunnel for private ip load balancing cf-lb-test-private-ip-cloudflared: image: cloudflare/cloudflared:latest container_name: cf-lb-test-private-ip-cloudflared restart: unless-stopped command: tunnel --no-autoupdate run --token eyJhIjoiNjM4ZjJkNDA3MWUzNWYyZGY5YzYzNG<redacted> networks: - cf-lb-test-private-ip-cloudflared networks: cf-lb-test: external: false # tunnel 1 network cf-lb-test-node-1-cloudflared: name: cf-lb-test-node-1-cloudflared # tunnel 2 network cf-lb-test-node-2-cloudflared: name: cf-lb-test-node-2-cloudflared # tunnel 3 network cf-lb-test-node-3-cloudflared: name: cf-lb-test-node-3-cloudflared # tunnel network for private ip load balancing cf-lb-test-private-ip-cloudflared: name: cf-lb-test-private-ip-cloudflared
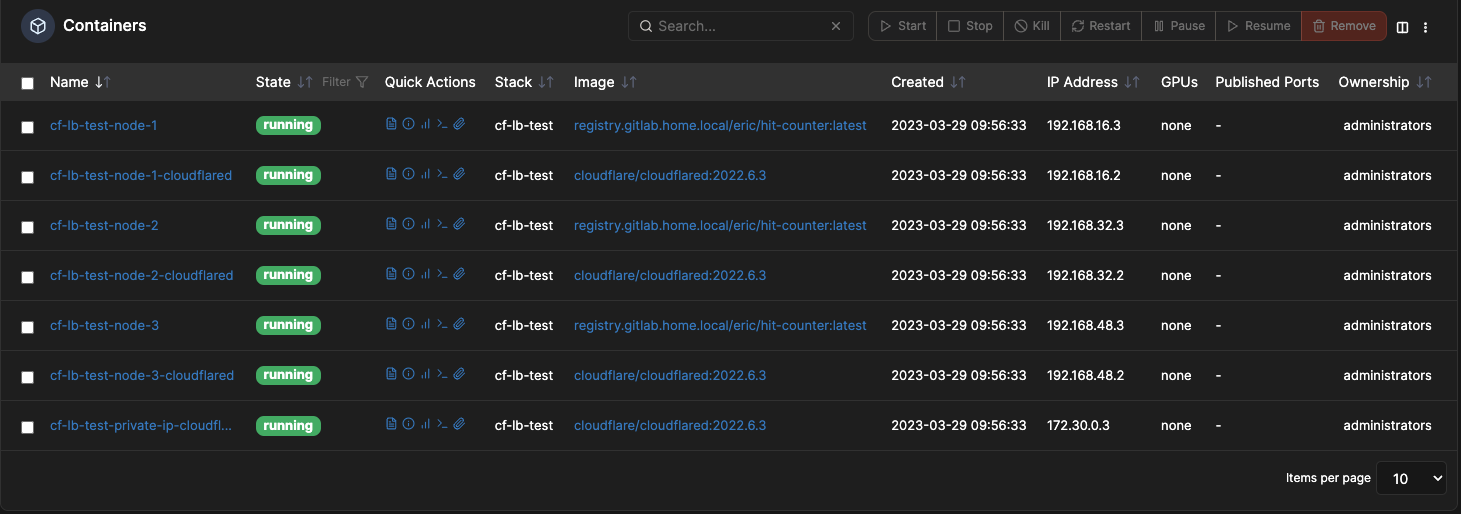
- Deploy the stack by Clicking Deploy the stack under Actions at the bottom of the screen. If you see no errors, you should see the following containers running.
![image]()
Cloudflare Zero Trust (Part 2)
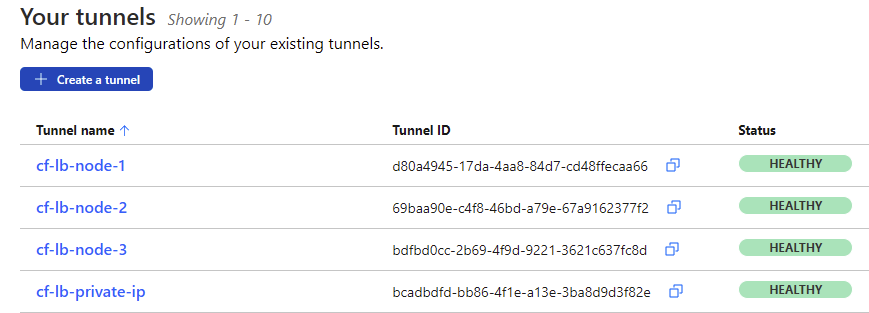
- Navigate to Cloudfare Zero Trust dash > Access > Tunnels. You should see each of the tunnels reporting a healthy status. When you deployed the Stack, each cloudflared container established a connection to Cloudflare using the supplied token.
![image]()
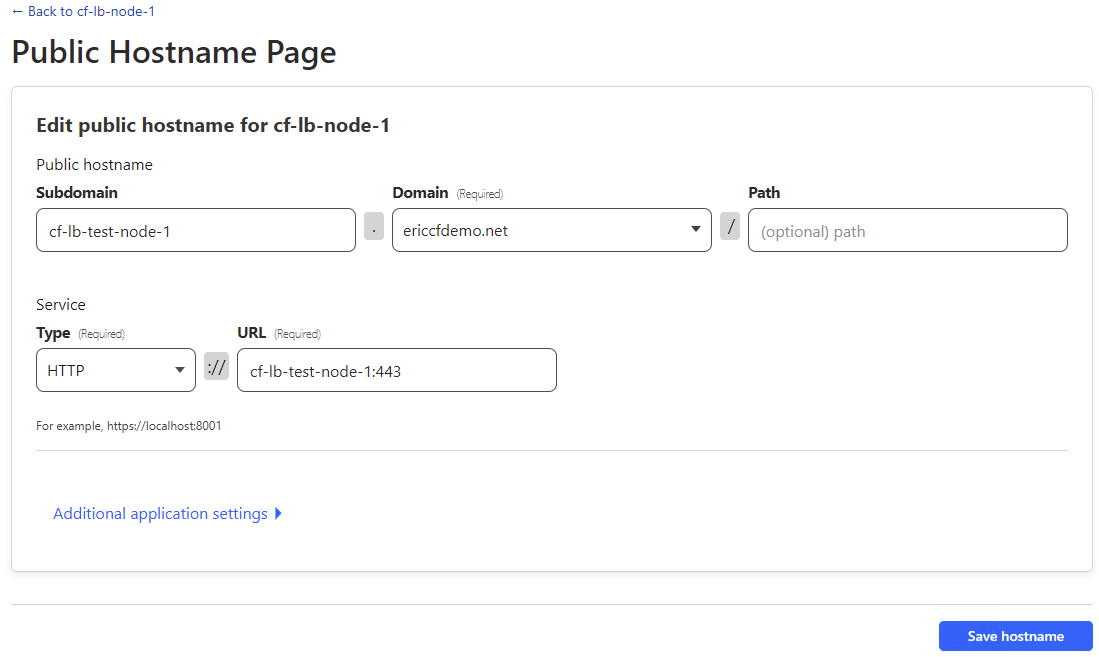
- For the tunnels
cf-lb-node-1,cf-lb-node-2, andcf-lb-node-3, configure them as follows:Substitute Subdomain, Domain and URL for the appropriate values for each tunnel.
![image]()
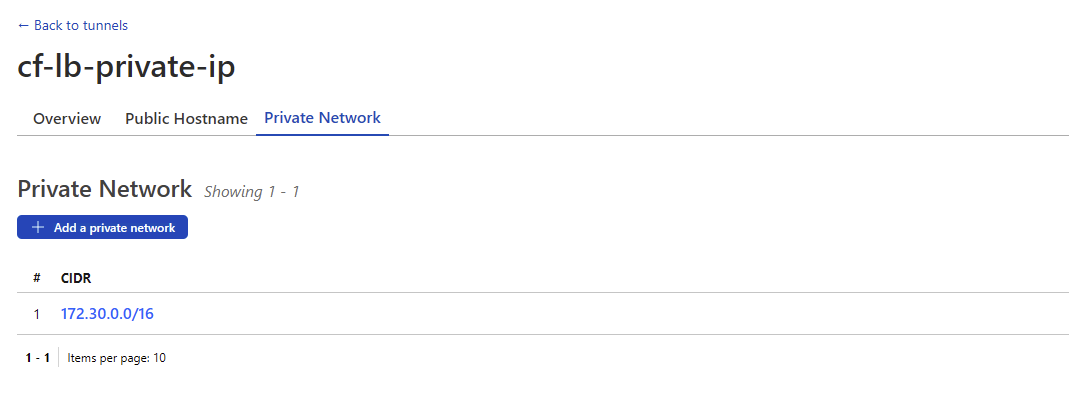
- Now we will configure
cf-lb-private-ipto publish the private address range172.30.0.0/16. Configure it as follows:You can find the network in portainer by going to Networks > cf-lb-test-private-ip-cloudflared. Note: your address range will be different to mine.
![image]()
Cloudflare Dashboard
In this section we will create three (3) origin pools (test-pool-1, test-pool-2, and test-private-lb) and two (2) load balancers (test-lb, and test-private-lb).
I will show these steps using the API. This is purely to keep things simple and not have dozens of pictures showing each step in the dashboard. Feel free to manually create the Pools and Load Balancers.
- Create
test-pool-1. This pool will contain nodescf-lb-test-node-1andcf-lb-test-node-2.For Steps 1 - 3 record the pool
idfor use in Step 4 and Step 5. It will look like"id": "88de77560077160226ed83a3fde5ff9c"in the command output.Refer to Cloudflare API documentation for further detail on the specific attributes used in these steps.
The
addressinoriginscorresponds to the Cloudflare Tunnel address for each container.1 2 3 4 5 6 7 8 9 10 11 12 13 14 15 16 17 18 19 20 21 22 23 24 25 26 27 28 29 30 31 32 33 34 35 36 37 38 39 40 41
# Create pool test-pool-1 (cf-lb-test-node-1 and cf-lb-test-node-2) import requests url = "https://api.cloudflare.com/client/v4/accounts/<your account>/load_balancers/pools" payload = { "check_regions": ["OC"], "description": "Test - Pool 1", "enabled": True, "monitor": None, "name": "test-pool-1", "notification_filter": { "pool": {"disable": True} }, "origin_steering": {"policy": "random"}, "origins": [ { "address": "d80a4945-17da-4aa8-84d7-cd48ffecaa66.cfargotunnel.com", "enabled": True, "header": {"Host": ["cf-lb-test-node-1.ericcfdemo.net"]}, "name": "cf-lb-test-node-1", "weight": 1 }, { "address": "69baa90e-c4f8-46bd-a79e-67a9162377f2.cfargotunnel.com", "enabled": True, "header": {"Host": ["cf-lb-test-node-2.ericcfdemo.net"]}, "name": "cf-lb-test-node-2", "weight": 1 } ] } headers = { "Content-Type": "application/json", "X-Auth-Email": "<your email>", "X-Auth-Key": "<your key>" } response = requests.request("POST", url, json=payload, headers=headers) print(response.text)
- Create
test-pool-2. This pool will contain nodecf-lb-test-node-31 2 3 4 5 6 7 8 9 10 11 12 13 14 15 16 17 18 19 20 21 22 23 24 25 26 27 28 29 30 31 32 33 34
# Create pool test-pool-2 (cf-lb-test-node-3) import requests url = "https://api.cloudflare.com/client/v4/accounts/<your account>/load_balancers/pools" payload = { "check_regions": ["OC"], "description": "Test - Pool 2", "enabled": True, "monitor": None, "name": "test-pool-2", "notification_filter": { "pool": {"disable": True} }, "origin_steering": {"policy": "random"}, "origins": [ { "address": "bdfbd0cc-2b69-4f9d-9221-3621c637fc8d.cfargotunnel.com", "enabled": True, "header": {"Host": ["cf-lb-test-node-3.ericcfdemo.net"]}, "name": "cf-lb-test-node-3", "weight": 1 } ] } headers = { "Content-Type": "application/json", "X-Auth-Email": "<your email>", "X-Auth-Key": "<your key>" } response = requests.request("POST", url, json=payload, headers=headers) print(response.text)
- Create
test-private-lb. This pool will contain nodescf-lb-test-node-1andcf-lb-test-node-2using their private IP addresses.Your private IP addresses will be different to mine. You can find your container IP addresses in Portainer by going to Networks > cf-lb-test-private-ip-cloudflared.
1
2
3
4
5
6
7
8
9
10
11
12
13
14
15
16
17
18
19
20
21
22
23
24
25
26
27
28
29
30
31
32
33
34
35
36
37
38
39
40
41
42
43
44
45
46
47
48
49
 # Create pool test-private-lb (cf-lb-test-node-1 and cf-lb-test-node-2)
 import requests

 url = "https://api.cloudflare.com/client/v4/accounts/<your account>/load_balancers/pools"

 payload = {
     "check_regions": ["OC"],
     "description": "CF Tunnel to expose private IP range",
     "enabled": True,
     "monitor": None,
     "name": "test-private-lb",
     "notification_filter": {
         "pool": {"disable": True}
     },
     "origin_steering": {"policy": "random"},
     "origins": [
         {
           "name": "cf-lb-test-node-1",
           "address": "172.30.0.4",
           "enabled": True,
           "weight": 1,
           "header": {
             "Host": [
               "cf-lb-test-node-1.ericcfdemo.net"
             ]
           }
         },
         {
           "name": "cf-lb-test-node-2",
           "address": "172.30.0.2",
           "enabled": True,
           "weight": 1,
           "header": {
             "Host": [
               "cf-lb-test-node-2.ericcfdemo.net"
             ]
           }
         }
     ]
 }
 headers = {
     "Content-Type": "application/json",
     "X-Auth-Email": "<your email>",
     "X-Auth-Key": "<your key>"
 }

 response = requests.request("POST", url, json=payload, headers=headers)

 print(response.text)
- Create load balancer
test-lb.your.domain.1 2 3 4 5 6 7 8 9 10 11 12 13 14 15 16 17 18 19 20 21 22 23 24
# Create the first LB (test-lb.your.domain) import requests url = "https://api.cloudflare.com/client/v4/zones/<your zone>/load_balancers" payload = { "default_pools": ["88de77560077160226ed83a3fde5ff9c", "8fee9136b840b5c0b2ead607ea03b948"], "description": "Load Balancer for test-lb.your.domain", "fallback_pool": "88de77560077160226ed83a3fde5ff9c", "name": "test-lb.your.domain", "proxied": True, "random_steering": { "default_weight": 1 } } headers = { "Content-Type": "application/json", "X-Auth-Email": "<your email>", "X-Auth-Key": "<your key>" } response = requests.request("POST", url, json=payload, headers=headers) print(response.text)
- Create load balancer
test-private-lb.your.domain.1 2 3 4 5 6 7 8 9 10 11 12 13 14 15 16 17 18 19 20 21 22 23 24
# Create the second LB (test-private-lb.your.domain) import requests url = "https://api.cloudflare.com/client/v4/zones/<your zone>/load_balancers" payload = { "default_pools": ["88de77560077160226ed83a3fde5ff9c", "8fee9136b840b5c0b2ead607ea03b948"], "description": "Load Balancer for test-private-lb.your.domain", "fallback_pool": "88de77560077160226ed83a3fde5ff9c", "name": "test-private-lb.your.domain", "proxied": True, "random_steering": { "default_weight": 1 } } headers = { "Content-Type": "application/json", "X-Auth-Email": "<your email>", "X-Auth-Key": "<your key>" } response = requests.request("POST", url, json=payload, headers=headers) print(response.text)
Cloudflare API
To enable load balancing of private IP addresses, we need to update the test-private-ip pool. This can be done with the UPDATE or PATCH API methods.
At the time of writing, this configuration can only be done via the API.
- Get the Cloudflare Tunnel Routes. This command will return all the cloudflare tunnel routes as a JSON string. We’re looking for the tunnel that is publishing the private address range for the docker network where our containers are running. In my case, the output looks like the following:
1
 {"network":"172.30.0.0/16","tunnel_id":"bcadbdfd-bb86-4f1e-a13e-3ba8d9d3f82e","comment":"","created_at":"2023-03-28T22:57:41.722545Z","deleted_at":null,"virtual_network_id":"060f2ab9-260f-42b1-8df2-ee8831215ca0","tunnel_name":"cf-lb-private-ip"}
We need the
"virtual_network_id":"060f2ab9-260f-42b1-8df2-ee8831215ca0"for Step 3.1 2 3 4 5 6 7 8 9 10 11 12 13 14 15
# List the tunnel routes. import requests url = "https://api.cloudflare.com/client/v4/accounts/<your account>/teamnet/routes" headers = { "Content-Type": "application/json", "X-Auth-Email": "<your email>", "X-Auth-Key": "<your key>" } response = requests.request("GET", url, headers=headers) print(response.text)
- Get the
test-private-lbid. This command will return configuration for all configured pools. Look through the output and identify theidfor thetest-private-lbpool. This is needed for Step 3.1 2 3 4 5 6 7 8 9 10 11 12 13 14
# Get the pool id for test-private-lb. import requests url = "https://api.cloudflare.com/client/v4/accounts/<your account>/load_balancers/pools" headers = { "Content-Type": "application/json", "X-Auth-Email": "<your email>", "X-Auth-Key": "<your key>" } response = requests.request("GET", url, headers=headers) print(response.text)
- Update the
test-private-lbpool. This query will update thetest-private-lbpool with the associatedvirtual_network_id. This identifies which tunnel is publishing the private address range for your origins.1 2 3 4 5 6 7 8 9 10 11 12 13 14 15 16 17 18 19 20 21 22 23 24 25 26 27 28 29 30 31 32 33 34 35
# Update the test-private-lb pool. import requests url = "https://api.cloudflare.com/client/v4/accounts/<your account>/load_balancers/pools/<your pool id>" payload = { "name": "private-lb", "origins": [ { "address": "172.30.0.4", "enabled": True, "header": {"Host": ["cf-lb-test-node-1.ericcfdemo.net"]}, "name": "cf-lb-test-node-1", "virtual_network_id": "060f2ab9-260f-42b1-8df2-ee8831215ca0", "weight": 1 }, { "address": "172.30.0.2", "enabled": True, "header": {"Host": ["cf-lb-test-node-2.ericcfdemo.net"]}, "name": "cf-lb-test-node-2", "virtual_network_id": "060f2ab9-260f-42b1-8df2-ee8831215ca0", "weight": 1 } ] } headers = { "Content-Type": "application/json", "X-Auth-Email": "<your email>", "X-Auth-Key": "<your key>" } response = requests.request("PATCH", url, json=payload, headers=headers) print(response.text)
- Create health monitor for
test-lb.your.domain.1 2 3 4 5 6 7 8 9 10 11 12 13 14 15 16 17 18 19 20 21 22 23 24 25
# Create Monitor (test-lb.your.domain) import requests url = "https://api.cloudflare.com/client/v4/accounts/<your account>/load_balancers/monitors" payload = { "allow_insecure": True, "description": "Monitor (test-lb.your.domain)", "expected_codes": "200", "follow_redirects": True, "interval": 60, "port": 443, "retries": 2, "timeout": 5, "type": "https" } headers = { "Content-Type": "application/json", "X-Auth-Email": "your email", "X-Auth-Key": "your key" } response = requests.request("POST", url, json=payload, headers=headers) print(response.text)
- Patch
test-pool-1andtest-pool-2to attach the newly create monitor.1 2 3 4 5 6 7 8 9 10 11 12 13 14 15 16 17
# Patch test-pool-1 import requests url = "https://api.cloudflare.com/client/v4/accounts/<your account>/load_balancers/pools/<your pool id>" payload = { "monitor": "c7fa18c7b2dbc5e651021718e9d3ee97", } headers = { "Content-Type": "application/json", "X-Auth-Email": "<your email>", "X-Auth-Key": "<your key>" } response = requests.request("PATCH", url, json=payload, headers=headers) print(response.text)
1
2
3
4
5
6
7
8
9
10
11
12
13
14
15
16
17
 # Patch test-pool-2
 import requests

 url = "https://api.cloudflare.com/client/v4/accounts/<your account>/load_balancers/pools/<your pool id>"

 payload = {
     "monitor": "c7fa18c7b2dbc5e651021718e9d3ee97",
 }
 headers = {
     "Content-Type": "application/json",
     "X-Auth-Email": "<your email>",
     "X-Auth-Key": "<your key>"
 }

 response = requests.request("PATCH", url, json=payload, headers=headers)

 print(response.text)
- Create health monitor for
test-private-lb.your.domain.At the time of writing, health monitors don’t appear to be working for private IP load balancing. I need to do further testing.
Testing
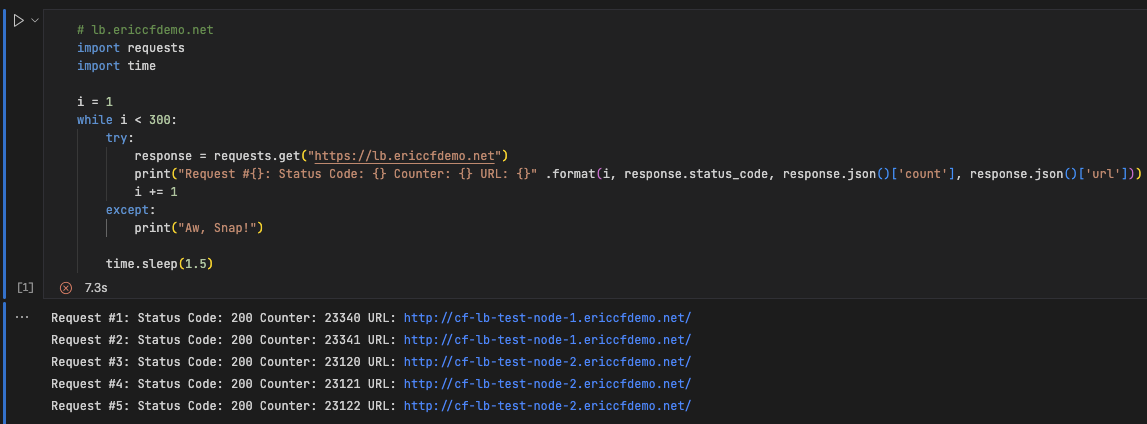
- Testing the traditional load balancer. Run the following script in vscode using Jupyter notebook.
1
2
3
4
5
6
7
8
9
10
11
12
13
14
 # lb.ericcfdemo.net
 import requests
 import time

 i = 1
 while i < 300:
     try:
         response = requests.get("https://test-lb.your.domain")
         print("Request #{}: Status Code: {} Counter: {} URL: {}" .format(i, response.status_code, response.json()['count'], response.json()['url']))
         i += 1
     except:
         print("Aw, Snap!")

     time.sleep(1.5)
You should see the similar output to the image shown below.
![image]() Stop the containers in test-pool-1. You will see an output similar to the images below.
Stop the containers in test-pool-1. You will see an output similar to the images below.
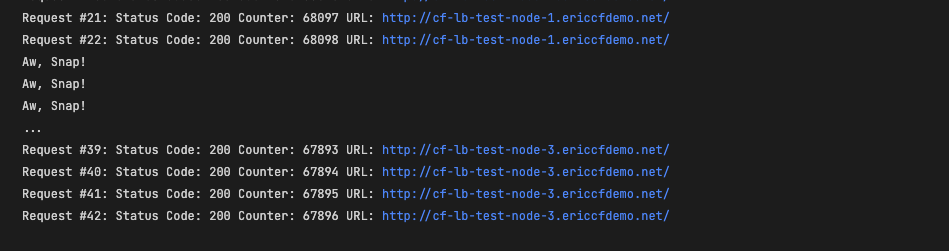
![image]() There will be an outage until the health monitor detects that test-pool-1 is down and traffic is redirected to test-pool-2.
There will be an outage until the health monitor detects that test-pool-1 is down and traffic is redirected to test-pool-2.
![image]()
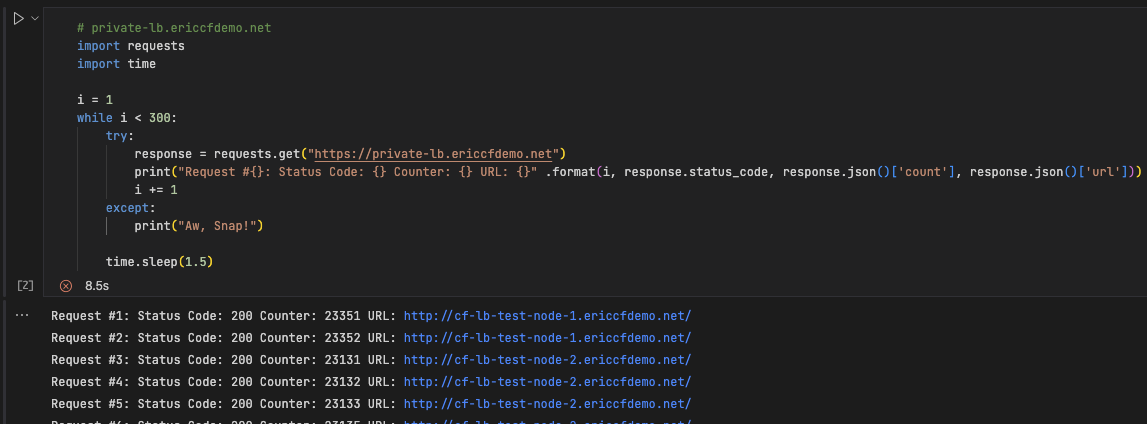
- Testing the private ip load balancing
At the time of writing, health monitors don’t appear to be working for private IP load balancing. I need to do further testing.
1
2
3
4
5
6
7
8
9
10
11
12
13
14
 # private-lb.ericcfdemo.net
 import requests
 import time

 i = 1
 while i < 300:
     try:
         response = requests.get("https://test-private-lb.your.domain")
         print("Request #{}: Status Code: {} Counter: {} URL: {}" .format(i, response.status_code, response.json()['count'], response.json()['url']))
         i += 1
     except:
         print("Aw, Snap!")

     time.sleep(1.5)
![image]()
 Stop the containers in test-pool-1. You will see an output similar to the images below.
 There will be an outage until the health monitor detects that test-pool-1 is down and traffic is redirected to test-pool-2.